Step by Step Example#
“
The Timing Diagram Signals#
Signal Name |
Freq |
Duty Cycle |
Edge Times |
Start State |
Format |
|---|---|---|---|---|---|
CLOCK |
50MHz |
50% |
2nS |
H |
|
ADD[15:0] |
2nS |
Z |
Hex |
||
CS* |
2nS |
H |
|||
DATA[7:0] |
2nS |
Z |
Hex |
||
RD_STROBE* |
2nS |
H |
|||
WR_STROBE* |
2nS |
H |
The Part Delays#
Delays |
Min |
Typ |
Max |
Description |
|---|---|---|---|---|
tclkadd |
7nS |
10nS |
12nS |
Add gen prop delay |
tpd |
7nS |
10nS |
12nS |
Comb prop delay |
tacc |
15nS |
20nS |
25nS |
Mem access time delay |
tclk2q |
2nS |
3nS |
4nS |
Reg clk2Q delay |
The Part Constraints#
Constraints |
Min |
Typ |
Max |
Description |
|---|---|---|---|---|
tsetup |
12nS |
12nS |
12nS |
Mem setup time |
thold |
1nS |
1nS |
1nS |
Mem hold time |
Start a New Timing Diagram#
To start a diagram, File Menu -> New or Ctrl-n
Start a new timing diagram.
Add the Part Delays and Constraints#
To add a Part Delay, Libs Menu -> Part Delay or Shft-1.
To add a Part Constraint, Libs Menu -> Part Constraint or Shft-2.
Add the Delays shown above.
Add the Constraints shown above.
Adding the Signals#
To add a Clock, Add Menu -> Clock or Ctrl-1
To add a Signal, Add Menu -> Signal or Ctrl-2
To add a Bus, Add Menu -> Bus or Ctrl-3
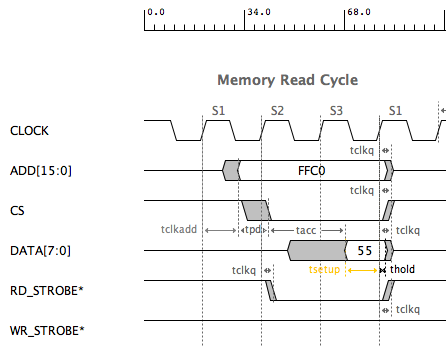
Add Clock CLOCK.
Add Bus ADD.
Add Signal CS*.
Add Bus DATA.
Add Signal RD_STROBE*.
Add Signal WR_STROBE*.
Adding the Pulses to the Signals#
To enable “Add Pulse” mode, click on AP button in Toolbar. Button background color turns dark.
Enable “Add Pulse” mode.
Set “Auto Increment” in toolbar to 0.
Set signal value in toolbar to FFC0.
Click in ADD bus at 30ns,50ns, and 70nS. This will make a FFC0 pulse for 3 clock cycles.
Click in CS* 2 times at 50nS and 70nS. This will make a low pulse for 2 clock cycles.
Change signal value to 55. Click in DATA bus at 70nS. This will make a 55 pulse for 1 clock cycle.
Click in RD_STROBE* 2 times at 70nS. This will make a low pulse for 1 clock cycle.
Disable “Add Pulse” mode.
Adding the Delays and Constraints#
To add a Delay, Add Menu -> Delay or Ctrl-7 or right button click for pop-up menu
To add a Constraint, Add Menu -> Constraint or Ctrl-8 or right button click for pop-up menu
You can quickly add previously used Delays or Constraints. Use the pop-up menu selections
To add a previously used Delay, right button click for pop-up menu and select “Add Used Delay”.
To add a previously used Constraint, right button click for pop-up menu and select “Add Used Constraint”.
Select 1st rising edge of CLOCK and 1st edge of ADD. Add delay tclk2add.
Select 1st edge of ADD and 1st edge of CS*. Add delay tpd.
Select 1st edge of CS* and 1st edge of DATA. Add delay tacc.
Select 1st edge of DATA and 4th rising edge of CLOCK.
Add Constraint. Select Max-Min Type. Add constraint tsetup.
Select 4th rising edge of CLOCK and 2nd edge of ADD. Add delay tclk2q.
Select 4th rising edge of CLOCK and 2nd edge of CS*. Add previously used delay tclk2q
Select 4th rising edge of CLOCK and 2nd edge of DATA. Add previoulsy used delay tclk2q
Select 4th rising edge of CLOCK and 2nd edge of DATA. Select Max-Min. Add constraint thold.
Select 4th rising edge of CLOCK and 2nd edge of RD_STROBE*. Add delay tclk2q
Click in delay and contraint labels in diagram and then use the arrow key combinations to position the labels.
Adding the StateBars#
To add a StateBar, Add Menu -> StateBar or Ctrl-4
Select 1st rising edge of CLOCK. Add StateBar S1 using dialog.
Select 2nd rising edge of CLOCK. Add StateBar S2 using dialog already open.
Select 3nd rising edge of CLOCK. Add StateBar S3 using dialog already open.
Select 4nd rising edge of CLOCK. Add StateBar S1 using dialog already open.
Timing Analysis#
You could increase the CLOCK frequency or change any of the delays to quickly check for constraint violations. This will indicate problems with fast clock rates or slower parts. Drag a Delay or Constraint edge to see the results immediately.